

Solve It With These Proven Method’s
( Full Explanation Below)
The Key To Getting Your Chord Changes Cleaner And Smoother Is To :
1 Practice Chord Changes Separately With The Chord Hand First.
2 Start With Chords That Are Already Clear To Practice Changes
3 Choose A Strum That Is Second Nature
4 Use Linked Changes and Pivot Fingers
5 Knowing The Exact Beat To Move The Chords To Change
6 Form The Chord Changes In Mid Air And In One Go By Putting Focus On Your Leading Finger
7 Keep Fingers Close To The Fret board While Changing
8 Use Only As Much Chord Pressure As You Need
9 Keep You Strumming Hand Moving And Not Stopping During Chord Changes No Matter What
10 Use A Beat Or A Metronome To Practice Your Chord Changes With
11 Tap Your Foot With The Metronome While Practicing All The Above
All these points above are stepping stones to achieving smooth chord changes, but the most important and seemingly and counter intuitive is to:
Keep Your Strumming Hand Moving And Not Stopping During Chord Changes No Matter What even if the chord hand lags behind the strumming hand a bit, or even a lot at first . This seems counter intuitive, but it works way better and faster than any other method. It makes you learn changes faster, and more accurate, helps chord changes work more in sync with the strumming in general.
I have used this method with teaching and seen this work like magic hundreds if not thousands of times .The details below will show you how all these method’s used together will speed up the process and make chord changes cleaner, more in sync and will set you up for better rhythm technique as well .
Lets look at it all in detail.
1 Practice Chord Changes Separately With The Chord Hand First
Look at the chord hand, and watch it while you go through your chord changes without strumming. Observe it closely and ask yourself exactly what is your hand doing? What fingers are lagging slow, which ones are leading? Observe observe observe. All the things you observe with your changes will relate to the following steps. Connect with your playing by watching your playing closely.
2 Start With Chords That Are Already Clear To Practice Changes
 Choose chords you can already can play clearly. Make sure you don’t have to think about where the fingers go too much at this stage.
You want to free up your brain tasks to concentrate on continuation of strum. Therefore choose chords you know.
The focus in the upcoming steps will be on changes, not where do my fingers go? So lets get some simple chords ready, and we will try to use chords that are linked. An example of some linked chords would be G to E minor , Am to C , Am to D7 etc. Notice there are some fingers in the same place for each chord. I will explain these more below in linked changes.
3 Choose A Strum That Is Second Nature
Start with a strum that is already easy for you to play so that you don’t have to think about strum patterns while you play. You won’t be focusing on what strumming patterns to use…..we want to set you up to focus on your changes. This will make it ten times easier for you to be able to learn smooth and seamless chord changes .

4 Linked Changes and Pivot Fingers
Its best to start with chord changes that are linked with common fingers for example C to Am , Em to G , Em to C . Notice how each change has a common finger or fingers in each change , they are linked .


This is sometimes called a pivot finger , or a linked change, or an easy change.But don’t think you will have the linked finger glued into position while you change chords. It may move within the fret and/or come off the fret board completely.
Next step , practice going through the chord changes …..by themselves , with no strumming whatsoever . Now look at your fingers and notice what they have to do to get the changes happening , and to get the fingers into the position they need to be to be clear . You will be surprised just how easy it is to get this hand to make the changes by themselves . This should give you clues that it is strumming and changing together that causes confusion the mind.
This is why the not stopping changing method which I’m about to show you is so cool. So first let’s make sure the strum pattern and the chord changes can operate separately and easily .
5 Knowing The Exact Beat To Move The Chords To Change
The exact beat or time to move from one chord to the next , is crucial . . The chord change is happening on the off beat . In a 4/4 strum pattern you will move your chords on beat + after the 4 , so your chord is in place already for beat 1 of the next bar .
1+2+3+4+ 1+2+3+4+
If you played this in slow motion you will notice that there is a mid-air strum, transition strum, that by itself sounds a bit messy ,but in among st the strumming pattern at normal speed, it will sound really smooth.
6 Forming The Chord Changes In Mid Air And In One Go By Putting Focus On Your Leading Finger
A lot of chord formations should eventually form millimeters above the strings and clampdown in one go. Don’t worry about getting this perfect right from the start, or even putting too much brain power into it . It will start to correct by itself, as long as you are taking care of the main points I have mentioned. You will start to see it happen in some chord changes before others. Beginner’s usually try to form chords one finger at a time, and this is slow but its not a huge problem, but something to reverse with the leading finger trick .. . Bear in mind you eventually want your chord changes to happen in one go , most of the time .It won’t be the case all of the time, some elaborate changing patterns don’t always work out this way. The basic open chords like C D A G Em Am D7 F E etc will definitely be the case .
Great trick for making chords form in one movement
Most beginners will lead a chord change with their first finger. When you change to a C Major chord , do your fingers move in the order 1,2,3….? Knowing what leading finger to put your focus on during the chord change will help you form the chord in one movement.
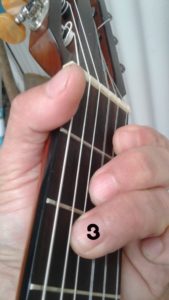
As one example use the C chord and put your concentration on your third finger to get there first. and don’t even worry about fingers one or two , they will follow quick and after some time , will correct the problem without you even having to think about it, and fingers 1 and 2 will eventually change at the same time as the third finger . If you do the 1 2 3 finger change on the C chord starting with first finger then second finger then third finger in order of placement, your chord hand will say to itself …dum da dum , no rush i’ll just take my time …, and it will take much longer to learn the chord change on time, so this is why its best to concentrate on your leading finger for certain chord changes . A chord leading finger 3
 D chord leading Finger 3
7 Keep Fingers Close To The Fret board While Changing
Try not to release your fingers like springs away from the fret board.
If you do this, you will make your fingers travel unnecessary distance …. the more distance you travel away from the fret board the more distance you have to travel back and the harder it’s going to be to get your changes cleaner and on time . Don’t make movements you don’t need to . Observe and watch for this , nip it in the bud if you catch yourself doing it .
8 Use Only As Much Chord Pressure As You Need
Make sure you are using the right amount of pressure on your chords and not too much !
If your chord pressure is too strong, the muscles in your hand are going to be too tight and restricted to make a good chord changes and get there on time.proper release and grab is part of the smooth process. The over tightness squeezing will make your chord changes shoddy and your hand sore etc. Chord clarity will suffer and so will your changes. Be graceful with your chord movements and economical with the pressure needed to make them clear. Don’t waste energy clamping down harder than you need to .
9 Keep You Right Hand Moving And Not Stopping During Chord Changes No Matter What

Here we go this is what we have been heading for This trick works
This is the biggie .
Now that we have the basics in place and we don’t have to think about strumming changes too much, we can now push the chord hand to do its thing by not by stopping the strumming hand .This is where you need to shift focus and concentrate on the strumming hand . I know this sounds back to front but stick with it . I have seen students struggle with chord changes for ages and use this method like magic. Be patient, it wont happen instantly, you have to push through it, It will also help your rhythm feel and changes way more in the long run . Even if your chord hand is slow doing a 123 change and not getting itself position on time it doesn’t matter , keep your right hand moving . Again this will seem back to front because you are forging ahead with your strum when your chords aren’t ready yet . Your mind and muscle memory will automatically speed things up using this method like you wouldn’t believe .
You just have to ignore the sound of your chord is not being in position yet .This is the tricky bit . This is why everyone stops strumming BUT it is amazing how fast this trick works . It is a mind trick to push through because your my mind is telling you “hang on my chord hand is not ready yet!” . If you can push through this barrier I promise you your chord changes will reach a new level very quickly. Even if you have no chord on the fret board whatsoever while you are strumming a few beats of the next bar, don’t worry, if you continue strumming you are doing it right to practice this technique. If you stop strumming ,you get it wrong, keep it moving.
This technique also helps with your internal beat in general . The stop starting with chord changes is a hard habit to break for beginners and is one of the first things I usually try to break people out of with all these tips. The continuation of rhythm is really a really important step to getting great strumming technique. Guitar playing and learning is full of cool things that can happen automatically if you set things up properly. This is one of them.
10 Use A Beat Or A Metronome To Practice Your Chord Changes With
A metronome beat or a beat of some sort can help your chord changes and strum in general stay in time.
Lock your strumming pattern in to the metronome or the beat and apply the not stopping method. A beat will help regulate your strumming patterns and give you a clock mechanism to stick to.
11 Tap Your Foot In Time With The Metronome
Tapping your foot in time with a metronome is linking your internal beat with your playing . It is extending the internal beat which emanates from your spine to the extremity of your foot . This will give you greater control of your rhythms in general. This will help your chord changes by making stronger the signals from the brain to the hands and feet . You will gain more co-ordination and dexterity by making this inner pulse stronger throughout your body. For a lot more info on this read https://goodguitarsense.com/index.php/2020/02/26/646/
Conclusion
Observe The Above Methods While Practicing Your Chord Changes , And Keep Physical Movement And Focus On The Continuation Of The Beat .
Remember The Beat Must Go On
All the Best Mark